 serin labs
Add a Mitsubishi mini-split to Home Assistant with ESPHome
Install ESPHome on a CN105 ESP32 controller to add a Mitsubishi heat pump directly to Home Assistant. Home Assistant displays the indoor unit as a climate entity, the vanes as selection controls, and each enabled reading as a sensor. All communication stays on your local network, and no online account is required. You can buy the pre-assembled CN105 controller or build one from the parts list.
Already have a controller? Set it up with Home Assistant.
At a glance
- The indoor unit appears as a standard climate entity without a bridge or cloud service.
- You can use standard Home Assistant features, including schedules, presence detection, templates, dashboards, and history.
- The integration uses echavet's open-source MitsubishiCN105ESPHome component.
Good to know
- This build requires Home Assistant with the ESPHome add-on. If you do not use Home Assistant, choose an Apple Home or Matter-compatible firmware instead.
- The browser installer provides a standard configuration. You can add optional features later over Wi-Fi; the USB cable is required only for the initial installation.
The standard browser-installed configuration includes core climate and vane controls. Room sensors, diagnostics, and other optional features require customizing the ESPHome configuration after adding the controller to ESPHome.
Controls and readings in Home Assistant
The standard configuration adds thermostat controls, airflow direction controls, the board's light and button, and readings for network status and firmware version. Home Assistant calls these controls and readings entities. Their IDs use the device name you choose. The entity reference explains each control and reading.
Climate control
Control Off, Heat, Cool, Auto, Dry, and Fan modes, with targets from 15 to 31°C in 0.5° increments and room temperature displayed to 0.1°. Changes made with the handheld remote appear in Home Assistant. Available fan speeds are listed in the control reference.
Auto mode uses one target by default. You can set separate heating and cooling targets with a customized configuration.
Vane control
The standard configuration includes vertical and horizontal vane selectors with fixed positions and Swing. The generator can add swing to the climate entity and Even, Indirect, or Direct airflow on supported units. Omit the horizontal control if your unit has no horizontal vane. See configuration options.
Room temperature sensor
You can configure the heat pump to use a temperature sensor already connected to Home Assistant. This includes sensors connected through Zigbee, Z-Wave, Bluetooth, or another ESPHome device. Fahrenheit sensors work too. Invalid readings are ignored, and the indoor unit falls back to its own sensor if the remote reading becomes unavailable.
Follow room sensor setup to add this generator option and verify the reading.
Heat pump diagnostics
The optional Diagnostics configuration adds nine sensors for compressor frequency, outside temperature, power and energy, runtime, connection uptime, and operating state. They are enabled when included, ready for Home Assistant history graphs. An optional i-See occupancy binary sensor is available on equipped indoor units.
See the diagnostics reference and customization guide.
Extra controls
Generator options add Night mode, Air purifier, and Circulator switches on indoor units that support them. ISU functions expose the unit's installer service codes. See optional controls and their limits before enabling them.
Serin Link YAML generator
For a generated configuration, expand Serin Link and enable Connect a Serin Link. This option is off by default; select it again when replacing an existing configuration that uses a Link.
The ESPHome build can pair with a Serin Link, a rotary control with a display for adjusting temperature and mode without a phone. The dial communicates directly with the controller, so it continues to work if Wi-Fi or Home Assistant is unavailable.
- Pair Serin Link and Forget All Links appear as buttons in Home Assistant and in the controller's enabled ESPHome web interface. Start pairing there, then choose Settings > Link > Pair on Serin Link.
- Serin Link Connected reports whether a Link is connected and can be used in automations.
- The dial follows the vane controls when they are included in the configuration.
The Serin Link is still in development. The firmware ships with support for it today.
Built-in web server
The standard firmware includes a web page for viewing readings and changing settings. You can use it to adjust mode, temperature, fan speed, and airflow direction before adding the controller to ESPHome or while Home Assistant is unavailable. See the web interface guide.
Updates and recovery
After installing the firmware over USB, add the automatically discovered controller to ESPHome. This step is called adoption. You can then install updates over Wi-Fi from the ESPHome dashboard. The standard build includes a fallback Wi-Fi setup network and supports sending Wi-Fi credentials over USB from the browser installer.
Use the setup guide to add the controller to ESPHome. After setup, see ESPHome updates and Wi-Fi recovery.
Building your own config
The browser-based YAML generator groups settings under Device details, Indoor unit options, Room temperature source, Serin Link, Optional controls, and Advanced options. The configuration preview updates as you make selections; use Copy configuration or Download .yaml to take the result into ESPHome.
Expand Existing ESPHome device to import recognized identity fields and credentials. The generator produces a complete replacement configuration: select your features again and restore any custom YAML and Wi-Fi settings before installing. No configuration data is uploaded.
Follow Customize ESPHome to back up, generate, install, and verify your changes, then open the YAML generator.
Supported boards
The browser installer and YAML generator support M5Stack NanoC6 and Atom S3 Lite. The component can run on other ESP32 boards with manual configuration and compilation. See supported boards and DIY parts.
Source code
Everything in this build is open source. The heat pump component is echavet's MitsubishiCN105ESPHome, and the configuration that packages it for these boards is in Serin-Labs/serin-cn105, alongside the fragments this site's generator assembles. The Serin Link component lives in serin-link-core. What each build is made of is listed on the licenses page.
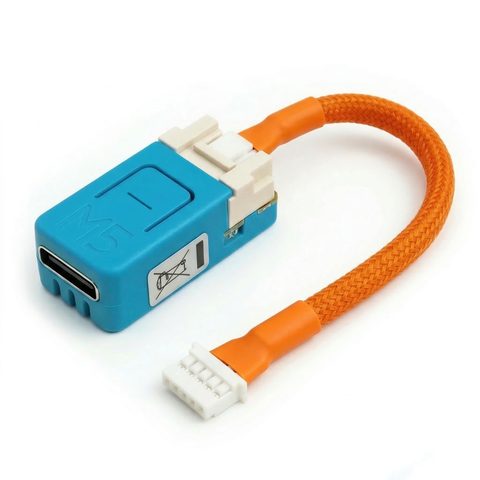
Get the Serin Controller
The pre-assembled board with the CN105 cable already attached. Nothing to solder or crimp, and free shipping in the US.
Buy Now from $35Already have a board?
The firmware is free. Install the ESPHome build from your browser in about two minutes, then follow the setup guide to join it to Wi-Fi and adopt it in Home Assistant.
Building your own? The parts list covers the boards this runs on and the CN105 cable, including the connector part numbers if you want to crimp it yourself.